Photobooth Online — Complete User Guide
No sign up. No download. Free.
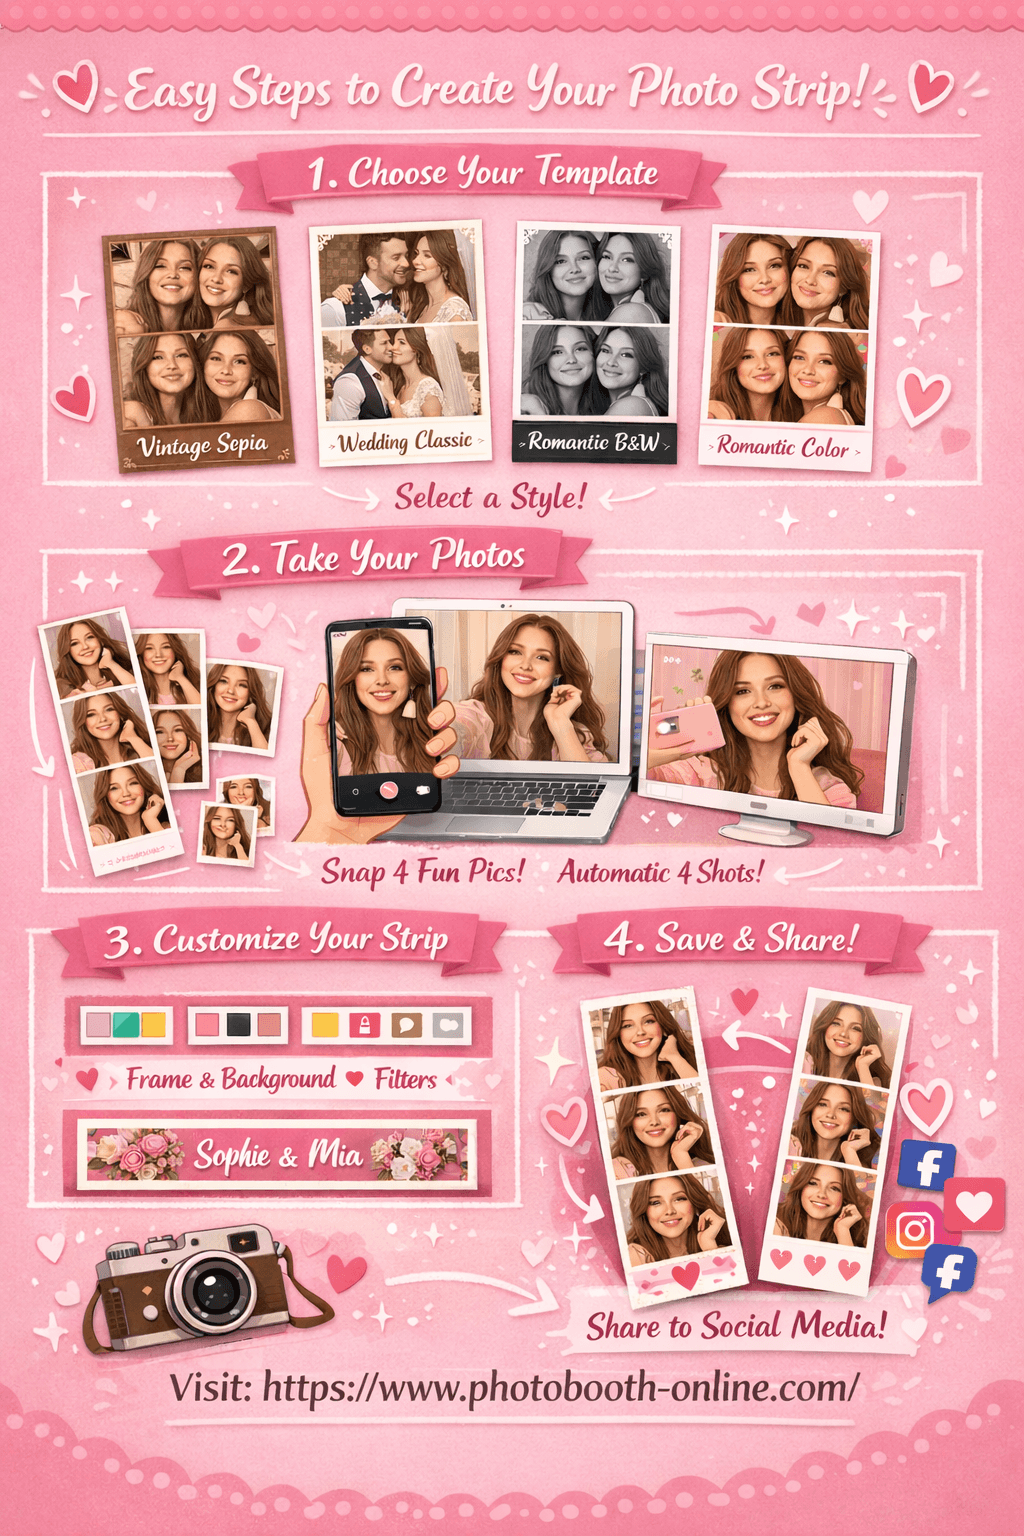
Photobooth Online is a browser-based photo strip maker. You open it, pick a template, take 4 photos with your device camera, customize the look, and download your strip. The entire process takes under 2 minutes. Your photos never leave your device.
What You Need Before You Start
Before you begin, make sure you have the following:
- A device with a front-facing camera (iPhone, Android, laptop, or tablet)
- A modern browser (Chrome, Safari, or Firefox — latest version recommended)
- Camera permission enabled in your browser
- Good lighting (natural light or a lamp facing you works best)
Step 1: Choose a Template
When you open the site, you land on the template selection page. There are 4 templates available:
| Template | Style | Best For |
|---|---|---|
| Vintage Sepia | Warm brown tones, aged film look | Casual hangouts, retro-themed events |
| Wedding Classic | Soft pink tones, clean and elegant | Weddings, bridal showers, anniversaries |
| Romantic Black & White | High-contrast grayscale | Date nights, formal events, editorial feel |
| Romantic Color | Vibrant full color, bright and fresh | Birthdays, parties, everyday fun |
Each template card shows 4 demo photos so you can preview the visual style before committing.
Click "Use this template >" on the card you want. You will be taken to the capture page with that template pre-selected.
Pro Tip:
You can always change the template style, colors, and filters later on the customize page. Pick based on mood rather than overthinking it.
Step 2: Take 4 Photos
This is where you take your photos. The page has two sections: the live camera preview on the left (or top on mobile), and the photo thumbnails with controls on the right (or bottom on mobile).
Allow Camera Access
When the page loads, your browser will ask for camera permission. Click Allow.
If you accidentally clicked Block:
- iPhone Safari: Go to Settings > Safari > Camera > Allow
- Chrome desktop: Click the camera icon in the address bar and select Allow
Start Shooting
The camera feed is mirrored like a selfie camera. Frame yourself in the center before you start.
- 1Click the Shoot Button
Tap the camera icon button at the bottom of the screen to begin the shooting sequence.
- 2Hold Still for the Countdown
A 3-second countdown appears on screen before each photo. The screen flashes white when the shot is taken.
- 3Watch Your Thumbnails Appear
Each captured photo appears immediately as a thumbnail in the sidebar. You do not need to click anything between shots. The sequence runs automatically.
- 4Complete All 4 Shots
Repeat until all 4 photos are taken. The Continue button appears when the sequence is done.
Pro Tip:
Take a few test shots first to check your framing and lighting. Use the Retake button to clear all photos and start the sequence again from scratch.
Step 3: Customize Your Photo Strip
The customize page is split into two panels. The left panel shows a real-time preview of your strip. The right panel has all the controls. Every change you make is reflected instantly in the preview.
Border Color
Six color swatches let you change the border color of your photo frames. Click any swatch to apply it. The selected swatch shows a highlight ring.
Available colors: White, Black, Soft pink, Warm tan, Hot pink, Sky blue.
Background Color
Six background swatches control the strip background — the area around and between the photo frames.
Available colors: White, Blush, Cream, Near-black, Light rose, Pale blue.
Filter
Four filter options change the tone of all 4 photos at once:
| Filter | Effect |
|---|---|
| None | Original color, no adjustment |
| Sepia | Warm brown vintage tone |
| Grayscale | Classic black and white |
| Warm | Slightly boosted saturation and brightness |
Footer Text
A text input lets you change the watermark text at the bottom of your strip. It defaults to "PHOTOBOOTH". You can type a date, a name, an event title, or leave it as is.
Pro Tip:
Try the Grayscale filter with a black background and white border for a dramatic editorial look. It works especially well for the Romantic Black & White template.
Step 4: Download Your Photo Strip
When you are happy with the preview, click the "Download Photo Strip" button. It is the large pink button at the bottom of the right panel.
- 1Click Download Photo Strip
Click the large pink button at the bottom of the right panel. The strip begins generating immediately.
- 2Desktop: Save to Downloads
On desktop, the strip saves directly to your Downloads folder as a PNG file. Filename format: photobooth-[template]-[timestamp].png
- 3Mobile: Long-Press to Save
On iPhone or Android, the strip opens as an image. Long-press the image and select "Save to Photos" or "Add to Camera Roll" from the menu.
Pro Tip:
The downloaded strip is full resolution (400px wide, approximately 1300px tall) and ready to share directly to Instagram, WhatsApp, or print at home.
Navigation Reference
The top navigation bar gives you quick access to all pages at any time:
| Link | URL | When to Use |
|---|---|---|
| Home | / | Go back to pick a different template |
| Capture | /capture | Jump straight to the camera page |
| Customize | /customize | Jump straight to the customize page |
| Blog | /blog | Read tips and guides |
Quick Reference
The complete flow from start to finish:
- 1Open the site
- 2Choose a template
Click "Use this template >" on your chosen template card.
- 3Allow camera access
Click Allow when your browser asks for camera permission.
- 4Take 4 photos
Click the shoot button and let the automatic countdown sequence run.
- 5Click Continue
Once all 4 shots are done, click the Continue button.
- 6Customize your strip
Adjust border color, background, filter, and footer text.
- 7Download
Click "Download Photo Strip". On mobile, long-press the image to save.
Total time: under 2 minutes.
Frequently Asked Questions
Do I need to create an account?
No. There is no sign up, no login, and no account required at any point.
Is it really free?
Yes. The full experience — template selection, photo capture, customization, and download — is completely free with no hidden fees.
Are my photos uploaded to a server?
No. All photo processing happens entirely in your browser. Your photos never leave your device.
Can I use it on my phone?
Yes. It works on iPhone and Android. Use Safari on iPhone or Chrome on Android for the best experience.
Can I retake my photos?
Yes. After all 4 photos are taken, a Retake button appears. Clicking it clears all 4 photos and restarts the sequence from scratch.
Can I change the template after taking photos?
Yes. Click Home in the nav bar to go back to template selection. Your captured photos are saved in your browser so they reload when you return to the customize page.
What resolution is the downloaded strip?
The strip exports at full resolution (400px wide, approximately 1300px tall) as a PNG file, suitable for printing and social sharing.
What if my camera does not load?
Check that your browser has camera permission for this site. Try refreshing the page. On some devices only one app can use the camera at a time, so close other apps that might be using it.