A spotlight photo booth uses one focused light to create high-contrast, editorial-style portraits—the kind you see at upscale events. Most search results push rentals and gear. You can get the same cinematic photo strip look online, in your browser, with no rental and no attendant. Pick a black-and-white template, control your light, and download a spotlight-style strip in minutes.
What Is a Spotlight Photo Booth? (And Why the Look Works)
A photo booth spotlight setup is built around a single directional light. Instead of flooding the face with soft light from all sides, one beam sculpts the subject. Shadows add depth. The background falls dark. The result feels like a magazine spread, not a casual snapshot.
Rental companies sell this as a premium add-on: dramatic lighting rigs, snoots, black backdrops. The aesthetic isn’t owned by the hardware. It’s controlled light plus high-contrast tone—and you can get both with a browser-based strip and a bit of setup.
Spotlight vs. regular booth: Regular booths aim for bright, even light and cheerful vibes. A booth spotlight does the opposite. It uses shadow on purpose. One key light, one subject, one strong frame. When you switch that to black-and-white, you strip away color noise and get a timeless, editorial look.
Pro Tip:
You Don’t Need a Pro Rig to Get the Look
Most people think a spotlight photo booth means hiring a vendor with a snoot and a black backdrop, but the same visual effect comes from choosing the right template and a single directional light. We tested the Romantic Black & White template on Photobooth Online with a simple window as the key light—the strip kept strong contrast, looked editorial without any rental, and still gave a cinematic photo strip in minutes with no download, no sign-up, and everything running in the browser.
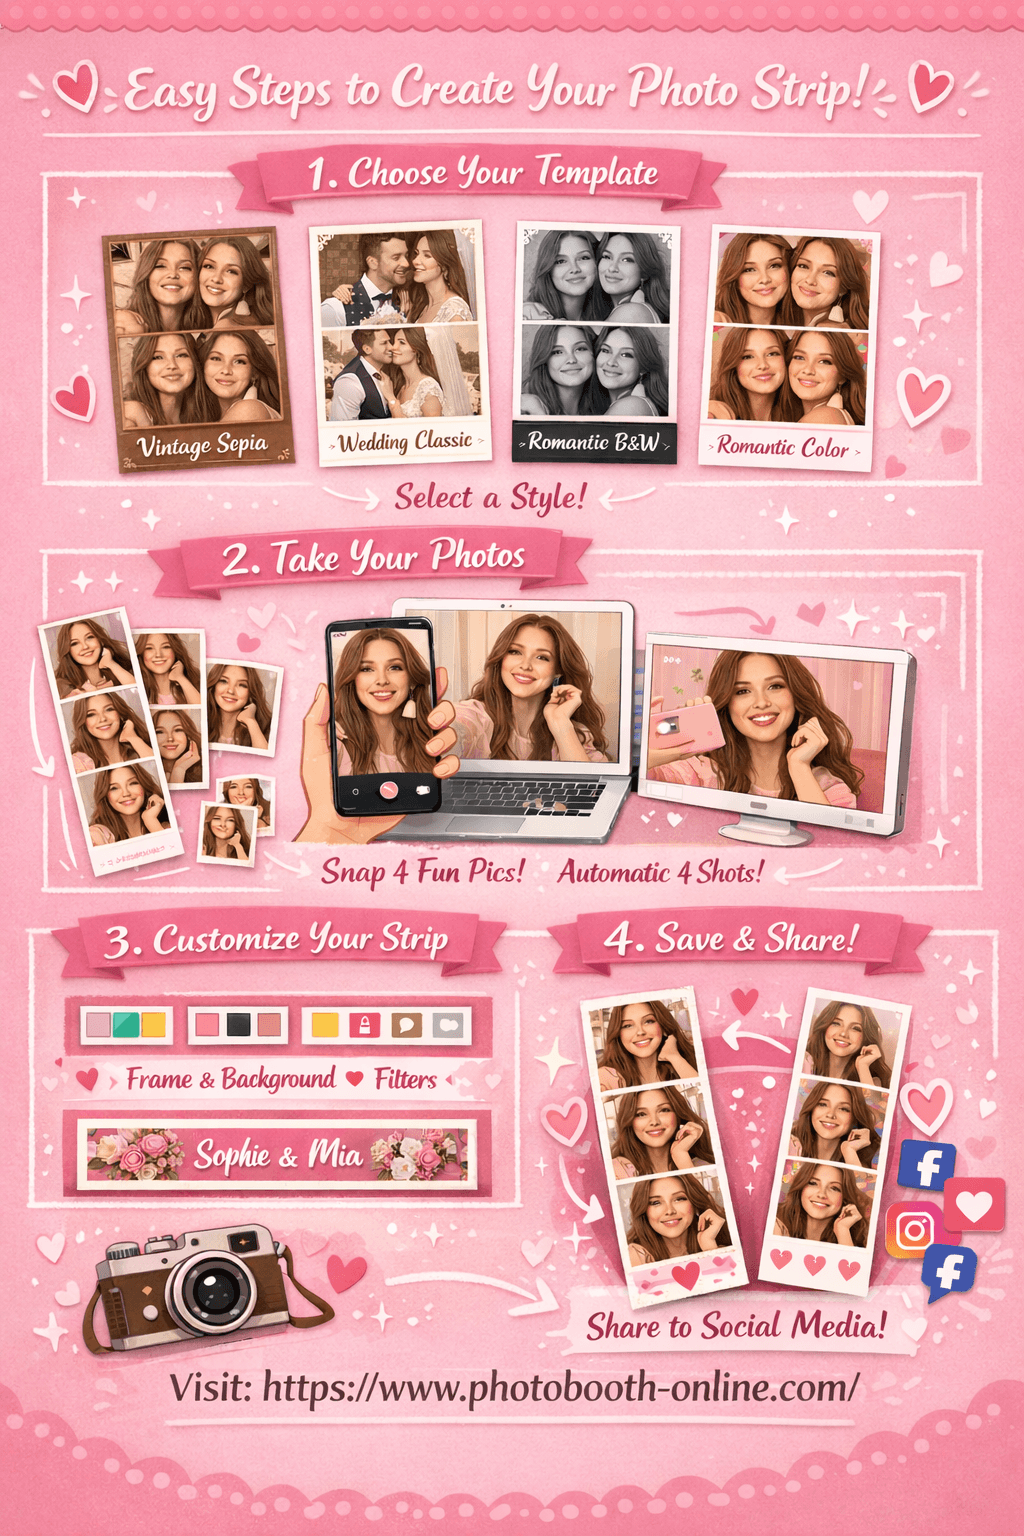
Step-by-step: Create a spotlight-style photo strip online
- 1Step 1: Choose Your Template
Go to Photobooth Online and pick a black-and-white style—for example Romantic Black & White or Wedding Classic. These templates give you the high-contrast, editorial base that reads as spotlight-style.
- 2Step 2: Take 4 Photos
Allow camera access and hit shoot. Use one main light source (window or lamp) from the side or slightly above so you get some shadow and dimension. The app takes 4 shots with a countdown; your photos show up as thumbnails as you go.
- 3Step 3: Customize & Download
In the editor, tweak border color, background, and footer text. Preview updates live. Hit "Download Photo Strip" to save—on mobile, long-press the image to save to your camera roll.
Why users love Photobooth Online for spotlight-style strips:
- ✅ 100% free — no hidden fees, no subscription
- ✅ No download or sign-up — open your browser and start
- ✅ Photos stay on your device — nothing is uploaded
- ✅ Works on any device — phone, tablet, or laptop
- ✅ Black-and-white and cinematic templates with real-time customization
- ✅ Download in seconds — full-resolution strip ready to share or print
Advanced Strategies for Spotlight-Style Strips
1) Use one key light and let the rest go dark
Theory: Spotlight looks work because one light defines the face. Everything else stays secondary.
Here's exactly how to do it:
- 1Place your main light to the side or slightly above
A window, desk lamp, or ring light at 45° works. Avoid flat front light if you want depth.
- 2Keep the background simple and darker than your face
A plain wall or sheet behind you helps the subject pop. Darker background reads more “spotlight.”
- 3Pick the B&W template after you shoot
In Photobooth Online, choose Romantic Black & White or similar so the strip already has the editorial tone.
2) Match the strip layout to how you’ll use it
Theory: A 4-frame strip works like a mini editorial sequence. Each frame can show a slightly different angle or expression.
Let me show you the exact steps:
- 1Frame 1: neutral, face the light
First shot is your “anchor”—clean and recognizable.
- 2Frames 2–3: small shifts
Turn a little or change expression. Keeps the strip from feeling static.
- 3Frame 4: strongest shot
Save your best look or smile for the last frame—it’s the one people remember.
3) Test in the same light you’ll use for the event
Theory: Rehearsing in similar light avoids surprises. What you see in the preview is what you get on the strip.
Here is the step-by-step process:
- 1Do a test strip a day before
Use the same room and time of day if the event is at home or a known venue.
- 2Check contrast on the final strip
If faces look flat, add a bit more direction to the light or move closer to the window/lamp.
- 3Stick to one template for consistency
Mixing styles in one event can look messy. One spotlight-style template for all guests keeps it cohesive.
Pro Tip:
What Real Users Say About Photo Booths and the Spotlight Look
Reddit and event forums are full of people who want “that dramatic, editorial look” without the cost of a full rental. One r/photobooth discussion on what actually matters for a booth highlights DSLR quality, templates, and ease of use—guests care most about how the final strip looks, not how many lights you have.
"What are the essentials for a photo booth? … Professional equipment and smooth setup for flawless results." — r/photobooth: essentials for a photo booth
The takeaway: the “spotlight” look is about the result—high-contrast, clean composition, editorial feel. You can get that with a browser-based tool and good light, without renting gear. Another thread on Photo Booth Online shows interest in exactly this—doing photo strips online with minimal setup.
So the demand is there. The gap is a simple path to that look. Pick a cinematic template, control your key light, and you’re most of the way there.
Common Mistakes to Avoid
1) Flat, even light when you want a spotlight look.
You get a friendly snapshot, not an editorial frame. Fix: use one main light from the side or above and let the rest of the scene go darker.
2) Busy or bright backgrounds.
They compete with the face and kill the “one subject, one light” feel. Fix: use a plain wall, sheet, or darker area behind you.
3) Skipping a test run before the event.
Light and angle change everything. Fix: do at least one full strip in the same space (or similar light) before the real day.
4) Mixing too many templates in one event.
Spotlight-style strips work best when the look is consistent. Fix: choose one black-and-white or cinematic template and use it for everyone.
FAQ
What is a spotlight photo booth?
A spotlight photo booth uses a single, directional light to create high-contrast, editorial-style portraits. The subject is lit from one main angle; shadows add depth. The look is often paired with black-and-white output for a cinematic, magazine-style result.
Do I need to rent equipment for a spotlight photo booth look?
No. You can get a spotlight-style photo strip online using a browser-based tool and one key light (e.g. a window or lamp). Pick a black-and-white or high-contrast template and position yourself so one light sculpts your face.
What’s the best template for a spotlight-style strip?
Choose a black-and-white or cinematic template, such as Romantic Black & White or Wedding Classic. These give you the contrast and editorial tone that read as “spotlight” without extra gear.
Can I use Photobooth Online for weddings and events?
Yes. You can share the link with guests so they create their own spotlight-style strips on phone or laptop. No download or sign-up; strips can be downloaded or saved to the camera roll.
How do I get the best light for a spotlight-style strip?
Use one main light source from the side or slightly above (about 45°). A window, desk lamp, or ring light works. Avoid flat front light if you want depth and shadow.
Is the spotlight look the same as a glam booth?
They’re related. Glam often means soft skin, B&W, and beauty-style lighting. Spotlight emphasizes one directional light and stronger shadow. Both can look editorial; spotlight is more “dramatic single light.”
Why do my strips look flat instead of spotlight-style?
Usually the light is too even (multiple sources or flat front light). Use one key light, keep the background simpler and preferably darker, and pick a B&W or high-contrast template.
Can I customize the strip after taking the photos?
Yes. In Photobooth Online you can change border color, background, footer text, and other options in the editor before downloading. Preview updates in real time.
Ready to create your own photo strip? Try Photobooth Online free → — no download, no signup needed.